Eyewear Reflection Try On: Simulating Reflections, Lens Glare, and Lighting Conditions for Better VTO
Quick Summary
A realistic eyewear reflection try on increases shopper confidence by showing how lenses react to real-world lighting.
Practical approaches:
- static compositing (fast), ML relighting (flexible), and real-time PBR/IBL (highest fidelity).
- Use HDRI/IBL and PBR materials to reproduce Fresnel behavior and coating effects; layer bloom/flare for convincing lens glare.
- Link-based, zero-code VTO (e.g., tryitonme.com) is a fast path to deploy lighting-aware previews without SDK work.
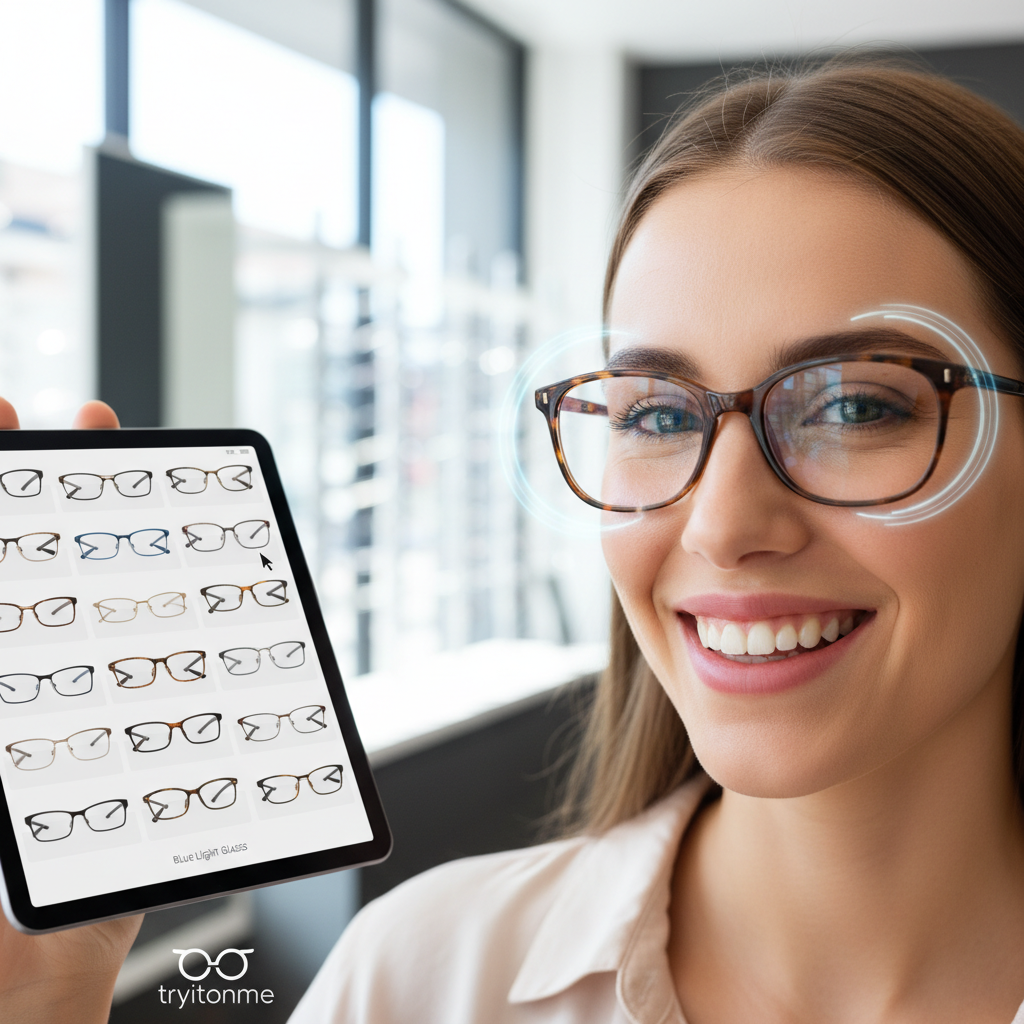
An effective eyewear reflection try on shows shoppers not just how frames fit, but how lenses behave under real-world light — including reflections, glare, and subtle color shifts. Static photos can’t convey those optical cues, which is why a lighting-aware virtual try-on (VTO) is essential for customer confidence and accurate expectations. tryitonme.com delivers a zero-code, link-based VTO that produces lighting-aware previews without any SDK or API integration.
Why reflections, glare and lighting matter for eyewear ecommerce (lighting conditions try on)
Customers decide on eyewear partly by how lenses and frames react to light. When reflections or glare are missing or inconsistent with real life, shoppers can feel uncertain, which affects engagement, conversion, and returns. For product and business teams, that translates into three core business impacts:
- Lower purchase confidence: optical effects signal quality (or the lack of it).
- Post-purchase surprise: mismatched expectations drive service contacts and returns.
- Missed upsell opportunities: premium coatings and lens options are harder to sell without visual evidence.
To address this, you need to solve three technical challenges:
- Accurately model reflections on curved glass and metal.
- Simulate lens glare (bloom, flare, specular highlights).
- Match lighting conditions across typical shopper environments.
We’ll unpack each of these and give practical options you can choose based on timeline, engineering capacity, and desired realism.
Fundamentals — What causes eyewear reflections and glare (lens glare try on)
At a high level, reflections and glare come from how light interacts with surfaces. Two useful distinctions:
- Specular reflections: mirror-like highlights that depend on viewing angle and surface smoothness.
- Diffuse reflections: scattered light from rougher surfaces that don’t create sharp highlights.
Two physical and rendering concepts you’ll see repeatedly:
- Fresnel behavior: reflection intensity changes with viewing angle; surfaces reflect more at grazing angles. See a basic primer on Fresnel equations.
- Anti-reflective coatings: thin-film coatings alter how much glare is visible. Learn more about anti-reflective coatings.
Rendering toolset (high-level):
- Image-Based Lighting (IBL): uses HDR environment maps to light objects from real-world lighting data.
- Physically-Based Rendering (PBR): material system that models light/material interaction consistently.
- HDRI (High Dynamic Range Images): environment maps with a broad luminance range used for realistic highlights (see Polyhaven’s HDRI library).
Think of a lens like a curved, partially reflective mirror with coatings that modify both specular intensity and tint. Curvature concentrates highlights; coating reduces or shifts them. In VTO, you replicate these behaviors via PBR materials, environment lighting, and selective post-processing (bloom/flare).
Technical approaches to eyewear reflection try on
There are three common technical paths to simulate eyewear reflections:
- Static compositing (image-based overlays)
- Real-time PBR rendering (WebGL/AR SDK)
- ML-based relighting (image-to-image approaches)
Each has trade-offs around realism, performance, engineer effort, and cross-platform coverage.
For realistic reflections, IBL + HDRI is the practical standard: using real-world environment maps produces natural highlights and directional light behavior. HDRI resources are available on Polyhaven. For PBR workflows and hands-on rendering guidance, reference a PBR tutorial like LearnOpenGL’s PBR overview.
Static compositing vs real-time PBR vs ML relighting
Quick comparisons — pros and cons:
- Static compositing
- Pros: fast, low engineering cost, works everywhere (web/mobile/social).
- Cons: reflections are baked and don’t change with the user’s pose or lighting; lower realism.
- Real-time PBR rendering
- Pros: high fidelity, dynamic reflections with environment probes, accurate Fresnel behavior.
- Cons: requires AR/SDK or WebGL integration, more engineering and device capability assumptions.
- ML-based relighting
- Pros: can adapt product imagery to match user photos; flexible for user-uploaded images.
- Cons: computationally heavy, needs training/tuning, and can produce artifacts or inconsistent results.
Graphics effects you may layer on top of these approaches include bloom and lens flare.
Recommended approach by timeline:
- Fastest launch: static compositing or a link-based VTO (no-code) that embeds environment-aware overlays.
- Balanced realism + speed: server-side PBR processing combined with shareable link (renders served to clients).
- Maximum realism: full client-side PBR/AR integration (SDK), when you have engineering bandwidth and control over devices.
Note: include “eyewear reflection try on” as a label in H1, intro, and prominent technical sections for SEO clarity.
Handling lens glare try on
Lens glare try on is about simulating blooms, flare, and specular highlights that happen when bright light hits the lens. Lens glare is distinct from broad reflections and is often what convinces a user that the preview matches their real-world experience.
Technical techniques to emulate lens glare:
- Screen-space highlights: compute bright spots in screen space and composite them where the lens is visible.
- Physically-based bloom: threshold-based blur that mimics how cameras and eyes perceive intense light.
- Additive glare overlays: stylized flare textures for strong sun hits.
- AR-coating simulation: reduce intensity and add subtle color shifts to simulate anti-reflective treatments.
Practical developer tips:
- Use HDRI-based lighting for consistent highlight placement.
- Simulate camera aperture and exposure to control bloom behavior.
- Tune bloom thresholds per SKU; shiny metal frames and mirrored lenses need different settings than matte frames.
- Expose a UI glare toggle so users can compare “glare on” vs “glare off” and see the difference.
User experience suggestions:
- Offer a simple “sun” preset or “bright outdoor” preview so shoppers immediately see how glare appears in high-contrast conditions.
- Label premium lens options with a short note like “AR coating reduces glare” so the visual matches the product feature.
Simulating lighting conditions try on
Realistic lighting conditions try on means showing eyewear under multiple common lighting situations: neutral indoor, bright daylight, golden hour, fluorescent office, and night with artificial spotlights.
How to approach this:
- Maintain a small, representative HDRI library (indoor, outdoor, golden-hour, fluorescent). Polyhaven is a good HDRI resource: Polyhaven HDRIs.
- Offer preset lighting scenes in the UI so non-technical merchandisers can pick relevant environments.
- Where possible, estimate ambient lighting from the user’s selfie to relight the product automatically; otherwise fall back to presets.
- Use simple tone-mapping and exposure controls to match how devices clamp highlights and shadows.
Device/browser constraints and fallbacks:
- Mobile browsers may auto-expose selfies which can change perceived lighting. Compensate server-side by normalizing exposure or by providing “preset” modes. See mobile performance notes: cermin.id mobile performance.
- If real-time relighting isn’t supported on a device, serve pre-rendered images per lighting preset.
Short copy you can use to instruct customers for best relighting:
“Stand facing a window or a single bright light. Keep your phone about 18–24 inches (45–60 cm) from your face. Avoid strong backlight for the most accurate preview.”
Practical implementation options and trade-offs (eyewear reflection try on)
When planning implementation, consider these three options with straightforward trade-offs:
Option A — Full AR / SDK integration
- Pros: maximum control, highest real-time fidelity, best for interactive AR experiences and complex animation.
- Cons: heavy engineering, platform-specific SDK work, longer time-to-market, ongoing maintenance.
Option B — Image-to-image compositing
- Pros: fast to implement, works on any channel, low client compute.
- Cons: limited to baked lighting; less convincing dynamic reflection and glare behavior.
Option C — Link-based, no-code VTO (recommended fast path)
- Pros: no SDK needed, zero-code deployment via shareable links, cross-platform (web, mobile, social), minimal engineering, quick iteration.
- Cons: some customization limits compared to in-app SDKs, but adequate fidelity is achievable with server-side rendering and good HDRI presets.
Short comparison (decision quick-check):
- Time-to-launch: C < B < A
- Engineering effort: C < B < A
- Reflection fidelity: A > C ≥ B
- Cross-platform reach: C ≥ B > A (unless you invest in multiple SDK variants)
Why tryitonme.com is the Right Fit for Your Business
tryitonme.com is built for brands that need realistic accessory VTO without heavy engineering. Key benefits:
- ZERO-CODE, LINK-BASED deployment — publish a shareable try-on link to product pages, email, and social posts (no SDK or API).
- Fast onboarding: purchase a 6‑month package based on SKU count → send standard product photos (front/side for eyewear) → the tryitonme team/AI handles AR processing → receive a unique, ready-to-use try-on link for deployment in under 3 business days.
- Cross-platform support: the same link works across web, mobile, and social channels.
- Minimal engineering: embed or share links without integration work, so product and marketing teams iterate quickly.
Want to see it in action? Book a Demo: tryitonme demo — or start a setup: tryitonme signup.
UX and merchandising best practices (lighting conditions try on)
Practical UX patterns increase engagement and help shoppers make choices:
- Lighting presets to show: neutral indoor, bright daylight, golden hour (warm evening), fluorescent office, low-light/night.
- UI patterns:
- Compare/split mode (left: no reflections, right: reflections on)
- Rotate head preview or small head-turn animation — see frame-fit guidance: frame-fit try-on guide
- Glare toggle (on/off)
- “Confidence” badge or short note when the user tries a lens with AR coating
- Microcopy examples:
- “Face forward, keep your phone at arm’s length, and avoid strong backlight.”
- “Tap ‘Outdoor’ to see how these lenses behave in bright sun.”
- Accessibility and performance:
- Keep image sizes optimized; lazy-load the try-on component.
- Provide progressive fallbacks — static thumbnails that link to the live try-on for devices that can’t render advanced effects.
Testing, metrics, and validation (eyewear reflection try on)
Instrument the try-on experience to learn what drives conversion:
Suggested KPIs
- Try-on engagement rate (clicks → active try-on sessions)
- Time-on-product for users who use try-on
- Conversion rate among try-on users vs non-users
- Return rate for items with try-on available vs without
A/B test ideas
- With/without reflections in the render
- Different glare intensity presets
- Number of lighting presets exposed to users
QA checklist (cross-device fidelity)
- Check reflection placement and intensity across major device classes (desktop Chrome, mobile Safari/Android browsers).
- Verify glare toggle behavior and preset switching.
- Confirm that share links open correctly from social and email clients.
For tryitonme product links, instrument: click → try-on session start → engaged actions (lighting changes, save/share) → demo or purchase. For a practical measurement plan and event suggestions for VTO KPIs, see: VTO analytics guide.
Implementation checklist (lens glare try on)
- Collect HDRIs or pick preset HDRIs from a small library (indoor, outdoor, golden hour).
- Prepare product assets: standard product photos (front and side) for eyewear; provide SKU list. Reference: product asset guide.
- Submit assets to tryitonme (or your chosen vendor) and configure lighting/reflection presets.
- Receive the unique try-on link and embed/share on product pages, social posts, and marketing campaigns.
- Monitor analytics and iterate on lighting presets and UI copy.
Timeline note: with tryitonme’s link-based workflow, the team/AI processes assets and delivers a ready-to-use try-on link in under 3 business days.
Conclusion and call-to-action (eyewear reflection try on)
Realistic eyewear reflection try on, accurate lens glare try on, and thoughtful lighting conditions try on are essential to give shoppers a clearer sense of how eyewear will look and perform. If you want speed plus convincing visual fidelity without an engineering project, tryitonme.com’s link-based, zero-code VTO is designed to get you live quickly and iteratively.
See a demo and book time with the team: tryitonme demo
Ready to start your setup: tryitonme signup
Visual & interactive assets (editor notes)
Recommended assets to include in the post:
- Before/after comparison images (caption: “No reflections vs. IBL reflections; presets: indoor/outdoor”).
- Side-by-side lighting presets (captions: “Indoor neutral HDRI,” “Bright daylight HDRI,” “Golden hour HDRI”).
- Short GIF or video demo of a tryitonme link working on web and mobile (caption: “Try-on link in action: quick lighting toggle and glare toggle”).
- Screenshot of the tryitonme demo page or embedded link: tryitonme demo.
Accessibility: provide alt text and short captions for each image (e.g., “Before/after: eyewear on model — left no reflections, right IBL reflections applied”).
SEO & editorial guidance
- H1/title contains the exact primary keyword: eyewear reflection try on.
- First paragraph must include the primary keyword naturally (done).
- Use target keywords across the article ~3–5 times each: eyewear reflection try on, lens glare try on, lighting conditions try on.
- Add HowTo/Product demo structured data and an FAQ block. See Google’s structured data guide: Google structured data.
- Suggested meta description: “Learn how to master eyewear reflection try on, lens glare try on, and lighting conditions try on — and deploy realistic, zero-code VTO via tryitonme.com’s link-based platform.”
Deliverables for the content owner
- Full draft article (this document).
- Visual asset list with captions and alt text suggestions (as above).
- Two tryitonme links/screenshots to include in the post: https://tryitonme.com/demo/eyewear and https://tryitonme.com/signup.
- FAQ block for structured data.
- Suggested A/B tests and analytics dashboard items (KPIs listed in the Testing section).
If you want, I can produce the accompanying visuals (before/after images, preset mockups) and a short GIF of the tryitonme link in action to embed in the post. Would you like me to prepare those next?
FAQ
Q: What is eyewear reflection try on?
A: It’s a virtual try-on experience that simulates how light reflects off lenses and frames so shoppers can see realistic highlights, mirrors, and environment reflections while previewing eyewear.
Q: How do you simulate lens glare try on?
A: Lens glare is simulated using bloom, flare textures, and thresholded highlights on lens areas, combined with HDRI-based lighting and camera exposure simulation (see bloom and lens flare concepts: bloom and lens flare).
Q: How do lighting conditions try on affect the experience?
A: Different lighting (indoor, outdoor, golden hour, fluorescent) changes highlight intensity, color temperature, and perceived contrast. Using a representative set of HDRIs lets you show how an eyewear SKU behaves across typical shopper environments (IBL primer: Image-Based Lighting).
Q: How fast can I implement VTO without code?
A: With a link-based provider like tryitonme.com, onboarding follows a simple process: purchase a 6‑month package for the number of SKUs, send standard product photos (front/side), the tryitonme team/AI handles AR processing, and you receive a ready-to-deploy try-on link in under 3 business days.
Q: Which approach gives the best reflection fidelity?
A: Full AR/SDK with client-side PBR delivers the highest fidelity and dynamic reflections. Link-based server-side PBR is a strong middle ground for realism vs. speed; static compositing is fastest but least dynamic.
Q: Where can I find HDRIs and PBR resources?
A: Good resources include Polyhaven HDRIs for environment maps and tutorials like LearnOpenGL’s PBR overview for material workflows.