 Jewelry Try On UX Woocommerce — Design, CTA Placement, Microcopy & PDP Conversion Best Practices
 Jewelry Try On UX Woocommerce — Design, CTA Placement, Microcopy & PDP Conversion Best Practices
- Use a prominent, single-tap try-on CTA near Add to Cart plus contextual image overlays for discovery.
- Provide clear microcopy and privacy helper text; always include upload/model fallbacks for camera failures.
- Lazy-load VTO assets, make try-on variant-aware, and track tryon_click → tryon_complete → add_to_cart_after_tryon.
- Link-based, zero-code deployment (tryitonme) is a fast way to pilot VTO on WooCommerce without SDKs or APIs.
Introduction — jewelry try on ux woocommerce
We’ll walk you through jewelry try on ux for WooCommerce and show designers and merchants how to design high-converting virtual try-on (VTO) experiences on product detail pages (PDPs). This post is practical: CTA placement, microcopy, fallbacks, PDP conversion best practices, recommended A/B tests, and a fast zero-code deployment option via tryitonme (no-code overview) so you can pilot VTO quickly without SDKs or API work.
Why virtual try-on matters for jewelry on WooCommerce
Jewelry presents UX challenges that apparel or eyewear don’t—small scale details, reflections, perceived fit, and how metal and gems catch light. Static photos and zooms can’t fully communicate these attributes; see an overview of jewelry e-commerce feature needs at AureateLabs. Virtual try-on helps customers visualize scale, placement, and shine; for tracking and rendering challenges see Picup Media and for AR benefits reference Zakeke.
UX principles for jewelry try-on experiences
Mobile-first, UX-first checklist:
- One-tap access: make try-on reachable in a single tap from the PDP or gallery. Source: Ideausher.
- Visual accuracy: prioritize lighting, color fidelity, and reflections; see Picup Media.
- Performance & perceived speed: lazy-load heavy assets; WooCommerce guidance at WooCommerce VTO.
- Camera permission UX: explain why you need access, show inline prompt, and provide an upload fallback.
- Accessibility basics: keyboard triggers, alt text, and clear instructions (see WooCommerce accessibility notes).
For a platform-agnostic checklist of jewelry try-on UX patterns see Cermin (Shopify guide).
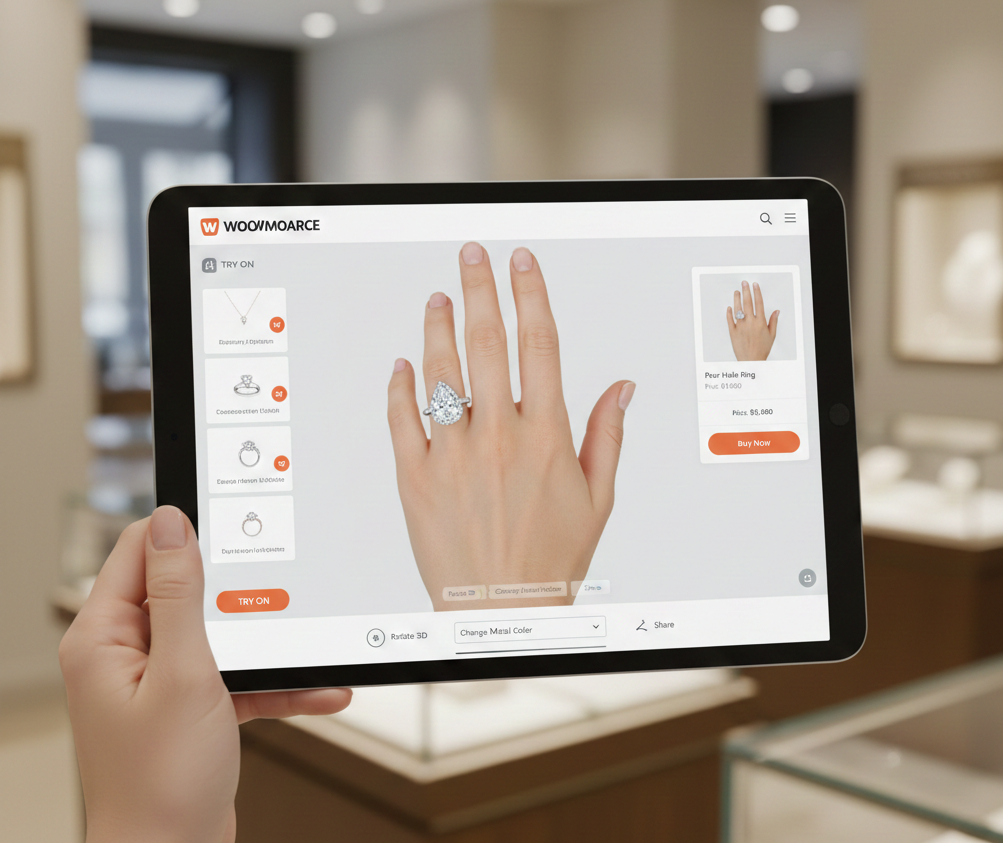
Try-on CTA placement — recommended placements and rules
Placement matters more than a single “best spot.” Balance visibility with context.
Primary placements (above-the-fold near Add to Cart; image gallery overlay)
- Above the fold, beside Add to Cart
- Pros: highest visibility, ties try-on to purchase intent.
- Cons: can crowd primary actions if over-emphasized.
- Microcopy example: “Try it on” or “See it on you”. See placement guidance at AureateLabs.
- Image gallery overlay / main image button
- Pros: contextual and intuitive—users click the photo to explore.
- Cons: requires tap/hover discovery on mobile/desktop.
- Microcopy example (overlay): “Try on — tap to preview”. WooCommerce plugin example: Commoninja Jewelfit.
Prescribed prominence order: 1) Above the fold near Add to Cart, 2) Image overlay, 3) Sticky FAB for mobile, 4) Quick view/grid hover for collections, 5) Secondary in description. Reference browser/retail UX patterns at Baymard and WooCommerce VTO docs.
Device-specific rules (desktop vs mobile)
- Desktop: use hover or click overlays and pair with near-cart CTA.
- Mobile: use a thumb-reachable FAB or sticky button; ensure it doesn’t overlap Add to Cart and follows ~44px touch target guidance.
- Use lightboxes/modals for seamless try-on flows on both desktop and mobile; see Commoninja example.
Microcopy that converts
Keep tone actionable, reassuring, and time-saving. Ready-to-copy CTAs:
- Primary CTAs: “Try it on”, “See it on you”, “Try on now — instant”.
- Benefit-led CTAs: “Try it on — see size & fit”, “Virtual try-on: 10s preview”.
- Permission prompts & helper text: “Allow camera to try on—only for preview.”; “Camera used only for the try-on session; images aren’t stored.” (See Ideausher and Picup Media for guidance.)
- Fallback CTAs: “Upload a photo to try on”, “View on model”, “See 360° preview”.
Microcopy testing tip: A/B test short CTAs (“Try it on”) vs descriptive CTAs (“Try this ring on your hand”).
Fallbacks & graceful degradation
Design for three failure modes: camera access, slow network, unsupported browser. User-first fallbacks:
- Upload photo flow: “Try it on—upload a selfie” (works when cameras are blocked). Example plugin: Commoninja.
- Model view and 360° product previews: curated images to approximate scale.
- Low-bandwidth stills: serve lighter assets or precomputed previews (AureateLabs guidance).
- Size overlays: ring diameter overlays or necklace length visuals.
Fallback CTAs: “Camera blocked? Upload a photo”, “No camera? View on model”, “Slow connection? See 360° preview”. Use conservative privacy phrasing (see Ideausher).
PDP conversion best practices
- Single CTA hierarchy: Add to Cart remains primary; try-on supportive and secondary (AureateLabs).
- Lazy-load VTO assets and only initialize the engine when invoked (WooCommerce VTO).
- Trust signals near purchase: ratings, warranty, shipping ETA.
- Variant-aware try-on: update try-on when users switch metal, size, or color (map SKUs to try-on links or query params).
- Cross-sell after try-on: show matching items on try-on completion to increase AOV.
Implementation on WooCommerce — zero-code step-by-step with tryitonme.com
Link-based VTO is the simplest path: add a “Try it on” anchor to your PDP and point it at a shareable tryitonme link—no SDKs, no API keys. See a link/embed example at Commoninja Jewelfit and WooCommerce product info at WooCommerce VTO.
- Purchase the package and create product entries in the tryitonme dashboard; send standard product photos (front/side). Onboarding: tryitonme. Pricing overview: Cermin pricing.
- Generate the shareable tryitonme link for each SKU in the dashboard (tryitonme provides the link).
- Add a “Try it on” button to your PDP linking to the tryitonme URL; place near Add to Cart or in the gallery.
- Optionally open the tryitonme URL in a lightbox/modal with a lightbox plugin (anchor + lightbox = no code).
- Add fallback links for upload/model views and append UTM params for analytics and A/B testing.
Tryitonme’s workflow: purchase 6-month package → send product photos → tryitonme processes AR assets → receive shareable try-on link (typically under 3 business days). See tryitonme and Cermin no-code overview.
Quick QA & tracking tips
- Add UTM tags to links and track events: tryon_click, tryon_start, tryon_complete, add_to_cart_after_tryon.
- Verify variant → link mapping when SKU changes.
- Test modal/lightbox behavior on iOS Safari, Android Chrome, and desktop browsers.
- Confirm fallback flows return to the PDP or a tracked conversion path.
Design patterns, assets & templates to include
- PDP wireframe mockups showing three CTA placements: above-fold near Add to Cart, gallery overlay, mobile FAB.
- Flow diagram: discovery → try-on → add-to-cart → post-try-on cross-sell.
- Microcopy bank: 5 CTA labels, 3 permission/policy lines, 3 fallback lines.
- Minimal HTML anchor example:
<a href="https://tryitonme.com/your-product-link?utm_source=pdp" class="try-on-btn">Try it on</a>
- Vendor selection artifacts & pilot checklists for rings: Cermin rings checklist.
Analytics, A/B testing plan & success metrics
Experiment matrix examples (placement × copy × fallback):
- Variables: placement (near cart vs image overlay vs FAB), microcopy (“Try it on” vs “See size & fit”), fallback (upload vs model).
- Suggested sample sizes: aim for ~1,000 visitors or 2 weeks per variation; see Baymard for guidance.
- Track events: tryon_click, tryon_start, tryon_complete, add_to_cart_after_tryon, vto_fallback_used.
- Measurement plan examples: Cermin analytics plan.
QA checklist & launch considerations
- Cross-browser/device camera flow tests (desktop, iOS Safari, Android Chrome).
- Permission handling & clear privacy copy (see Ideausher).
- Fallback validation (upload, model, 360).
- GDPR/consent wording in privacy policy and helper text.
- Lazy-load and performance monitoring (WooCommerce guidance: WooCommerce VTO).
- Support FAQ and CS troubleshooting scripts.
Case study / expected results & closing CTA
Example test: single popular ring SKU on one PDP, A: Try it on next to Add to Cart vs B: gallery overlay. Expect higher try-on engagement for gallery overlay and measurable uplift in add_to_cart_after_tryon. See business impact examples at AureateLabs and ring-specific ROI at Cermin ROI.
Why tryitonme.com is the Right Fit for Your Business
- ZERO-CODE, LINK-BASED deployment — add a tryitonme link to your PDP without SDKs or APIs: tryitonme.
- Fast time-to-market — onboarding returns ready links; details at tryitonme.
- Simple onboarding — buy a 6-month package, send standard photos, tryitonme handles AR processing and returns links (see Cermin pricing).
- Accurate accessory VTO optimized for jewelry and watches: tryitonme.
Book a Demo: tryitonme.com
Final deliverables checklist for your team
- Intro including primary keyword and tryitonme mention.
- Sections covering VTO value, UX principles, CTA placement, microcopy, fallbacks, PDP best practices, implementation steps, analytics/A-B plan, QA checklist.
- Microcopy bank with 5 CTAs and 3 fallback phrases.
- Step-by-step zero-code WooCommerce implementation using tryitonme links.
- A/B test matrix + KPI guidance (tryon_click, tryon_start, tryon_complete, add_to_cart_after_tryon).
- Visual asset list: 3 PDP mockups + flow diagram for designers.
Next steps
- Pick one high-traffic PDP and create a tryitonme link: tryitonme.com.
- Add the “Try it on” anchor near Add to Cart and measure tryon_click → add_to_cart_after_tryon for two weeks.
- Run a placement A/B test (near cart vs image overlay vs FAB) and iterate on microcopy.
References
- AureateLabs — Jewelry e-commerce features and VTO value
- Picup Media — How jewelry VTO works
- Zakeke — AR benefits for jewelry
- WooCommerce — Virtual Try-On product info & accessibility
- Commoninja — Jewelfit example
- Ideausher — AI/AR development & privacy
- Baymard — UX research: Jewelry & watches
- tryitonme — product & onboarding
- Cermin — tryitonme jewelry (no-code) overview
- Cermin — tryitonme pricing for accessories
- Cermin — Rings VTO pricing
- Cermin — ROI: Rings VTO
- Cermin — Jewelry try-on UX (Shopify guide)
- Cermin — Rings vendor checklist
- Cermin — Analytics measurement plan example
- Cermin — Mobile performance guidance
FAQ
What devices and browsers are supported for jewelry VTO?
Support varies by provider; link-based VTO via tryitonme works in modern mobile browsers (iOS Safari, Android Chrome) and desktop browsers that support camera APIs. Always test modal/lightbox flows across target devices and provide upload/model fallbacks for unsupported cases.
How do I handle privacy and camera permissions?
Show clear inline permission text before prompting the camera (e.g., “Allow camera to try on—only for preview.”). Use conservative language about storage and processing; if processing occurs on-device, state “processing happens locally on your device.” Refer to implementation guidance from Ideausher.
What are good KPIs to track?
Track try-on engagement (tryon_click / PDP views), tryon_start, tryon_complete, add_to_cart_after_tryon, PDP conversion rate, return rate, and time-to-purchase. Use UTM parameters and GA4/GTM events for attribution.
How can I implement VTO without heavy developer work?
Use link-based, zero-code providers like tryitonme. Add the provided product try-on URL to a PDP anchor or lightbox; no SDK or API integration is required.
What fallback options should I provide if the camera is blocked?
Provide an upload photo flow, model views, 360° previews, and low-bandwidth stills. Offer clear CTAs like “Camera blocked? Upload a photo” and ensure fallback flows are tracked with vto_fallback_used events.
Should I A/B test placement and copy?
Yes. Test placement (near cart vs overlay vs FAB), microcopy (“Try it on” vs benefit-led text), and fallback options. Aim for sufficient sample sizes (e.g., ~1,000 visitors or 2 weeks) and track tryon_click → add_to_cart_after_tryon. See testing guidance at Baymard.