Eyewear Try On Webflow: No‑Code Virtual Try‑On Guide
- Add glasses try-ons to your Webflow PDP without coding with a VTO (shareable URL) link.
- Embed options: open in new tab (fast), modal iframe (immersive), or inline iframe (seamless) — each method has its trade-offs.
- Core workflow: create a link per SKU in your VTO provider (e.g., TryItOnMe), store it in a CMS field, and bind it to a button/modal/iframe in your template.
- Measure impact with GA4 events and the provider’s dashboard; lazy-load iframes and set up fallbacks for browsers that block cameras.
Introduction — What is virtual eyewear try‑on and why is it important for Webflow
Virtual eyewear try-on (VTO) overlays frames onto a user’s face in real time using AR and AI facial mapping, allowing visitors to “try on” glasses directly from the product page before purchasing. For Webflow store owners, the link-based VTO approach provides a fast track to higher engagement and reduced returns without the need for SDKs/APIs or complex developer work.
Studies and business briefs show VTO impacts conversions and returns—see the integralis.dev overview. Technical explanations and practical demos can be found in the overview video. Example Webflow templates compatible with link-based VTO: Optix template. Case studies and local guides: Cermin.id tryitonme VTO.
Why link-based VTO vs. SDK/API for Webflow?
Consider implementation friction and long-term maintenance:
- SDK/API: requires developers for integration, testing, and updates; sensitive to browser/OS changes. See AR/AI implementation explanation.
- Link-based: paste URL into CMS, bind to button/modal/iframe — no SDK or API key required; vendor handles AR logic and updates.
Link-based advantages for Webflow:
- Zero code: just a URL in the CMS.
- Fast deployment: URLs work across browsers and mobile devices without platform-specific tweaks.
- Lower maintenance: vendors manage models and updates.
- Variant scalability: one link per SKU/color simplifies variant mapping; read FittingBox’s discussion on the new generation of VTOs for eyewear on the FittingBox blog.
- Template compatibility: compatible with templates like Optix.
Local comparison reference: Cermin.id comparison.
Why tryitonme.com is the right choice
- tryitonme.com offers zero-code deployment: create a shareable link and bind it to a PDP.
- Image processing by the team/AI typically returns a ready-to-use link in ~3 business days.
- Links work in browsers and on social sharing; perfect for mobile-first audiences.
- Analytics dashboard to monitor sessions and engagement: TryItOnMe dashboard. Request a demo: tryitonme.com/demo.
Quick overview & prasyarat untuk Webflow
Before you start, prepare your assets and access:
- Product images: 2–5 photos per SKU (front & side). AR/overlay asset guidance: video asset guidance.
- Variant planning: Decide whether each color has its own link.
- Access Webflow Designer to edit Product Collections; learn about Collections at Webflow University.
- Add a CMS field “Try On URL” (URL type) to the Product collection.
- GA4 access if you want to instrument events: GA4 setup.
- TryItOnMe account: Sign up and upload images and get a link.
Note: no developer skills required unless you want a custom JS variant.
Step‑by‑step implementation on Webflow
1) Prepare assets & create tryitonme.com product links
- Register/login at tryitonme.com.
- Upload 2–5 images per SKU; the platform generates a link per SKU or variant (e.g., https://tryitonme.com/vto/eyeglass-black).
- Use batch upload and CSV export for large catalogs, if available.
2) Add a “Try On URL” CMS field to the Product collection
- Go to Webflow Designer → Collections → Product collection; add the field: Try On URL (URL).
- Populate each product with the appropriate try on URL link, then publish the site.
- Collections reference: Webflow University — Collections.
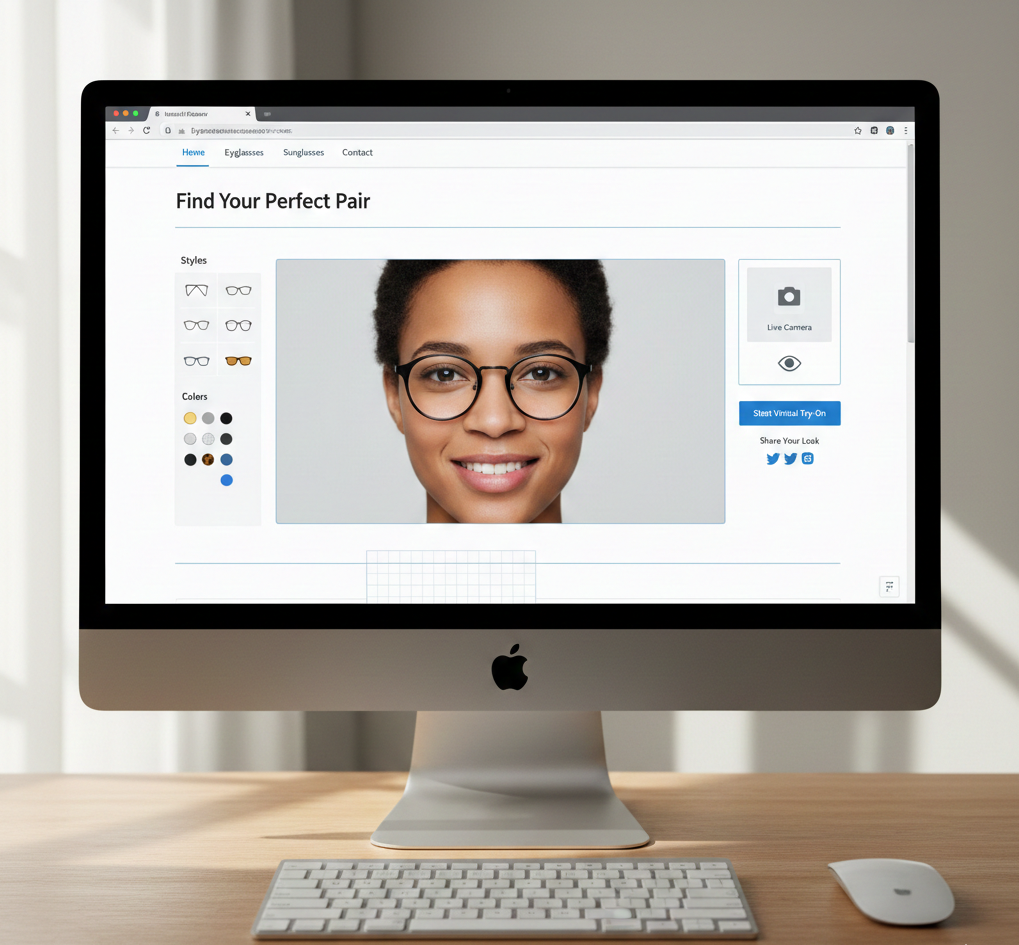
3) Option A — Simple link/button (open in new tab)
Fastest implementation:
- Add a button in the product template; bind the href to the CMS “Try On URL”.
- Set Target = _blank and add aria-label=”Open virtual try-on for [Product Name]”.
- Add UTM parameters: ?utm_source=webflow&utm_medium=pdp&utm_campaign=vto.
4) Option B — Modal dengan embedded try‑on (iframe)
For greater immersion, use the Embed element for iframes. Ensure a fallback opens the link in a new tab if the camera is blocked.
<iframe src="PUT_CMS_URL_HERE" width="100%" height="640" frameborder="0" allow="camera; autoplay" allowfullscreen></iframe>Use interaction to open/close the modal and clear the src when closing to stop the camera.
Embed Reference: Webflow Embed docs.
5) Option C — Inline iframe on PDP
To put VTO directly on a product page:
<iframe src="CMS_LINK" loading="lazy" style="width:100%;height:520px;border:none;" allow="camera; autoplay"></iframe>Use conditional visibility to have the iframe only load when the CMS link is available.
6) Variant mapping & dynamic src updates
- Recommendation: per-variant CMS field or structured field so Webflow can natively toggle links when the variant changes.
- Alternative: lightweight script to update iframe.src based on variant attribute data. Illustrative example:
<script>
document.querySelectorAll('.variant-option').forEach(el => el.addEventListener('click', function() {
  const url = this.getAttribute('data-vto-link');
  const iframe = document.querySelector('.vto-iframe');
  if (iframe) iframe.src = url;
}));
</script>
Prefer CMS‑driven mapping to minimize custom JS.
PDP placement & UX guidance for the Try‑On button
Recommended placement:
- Below the main product image/gallery.
- Next to Add to Cart.
- Mobile sticky bottom button for easy access.
Copy & microcopy:
- Button: “Try On”, “Try On Virtually”, atau “See It On You”.
- Microcopy: “No app required • Instant webcam try‑on”.
- Accessibility: add aria-haspopup=”dialog” to modal buttons; modals have dialog role with aria-labelledby.
Ide A/B test: tombol copy, placement, dan mode embed (modal vs new tab).
Theme edits & styling
Avoid heavy styling — let your WordPress theme handle colors and fonts. Here’s a quick guideline for buttons and modals:
- Button: 8px border‑radius; comfortable padding; accessible contrast (WCAG AA).
- Modal: max‑width ~900px; height ~80vh; clear focus trap and close button.
Add ARIA and ensure keyboard compatibility. Optional CSS examples can be placed in Project Settings or Embed if needed—but don’t force theme colors.
Embed methods compared — anchor, modal iframe, inline iframe
- Anchor (new tab): + fast & robust, – abandons PDP. Suitable for quick rollout.
- Modal iframe: + immersive, – cross-origin camera restrictions on some mobile devices; set up a fallback. See the camera/iframe caveats demo: YouTube caveats.
- Inline iframe: + seamless, – can affect load; use lazy load.
QA checklist & testing
- Functional: Test each product by opening the correct Try On URL; modal load & camera prompt; variant update.
- Cross-browser/device: Chrome/Firefox/Edge desktop; iOS Safari & Android Chrome.
- Camera & permissions: Ensure the stream stops when the modal closes; fallback occurs if permission is denied.
- UX & accessibility: Focusable keyboard buttons; modal traps focus; clear microcopy.
- Analytics: GA4 events sent and UTM available on outbound links.
Referensi permission/AR demo: video AR demos.
Tracking, analytics & measuring conversion impact
Recommended GA4 events:
try_on_click— user clicks the Try On buttonvto_session_start— iframe or VTO page loadedvto_session_complete— user selesai sesiadd_to_cart_after_vto—add to cart after VTO
Use UTM parameters for attribution: ?utm_source=webflow&utm_medium=pdp&utm_campaign=vto&utm_content={{variant}}. GA4 Guide: GA4 setup. Provider dashboard: TryItOnMe.
Best practices & common pitfalls
Do:
- Lazy-load iframes; load VTO on demand.
- Microcopy camera permission: reasons and how to revoke it.
- Per-variant links in CMS for accurate mapping.
- Fallback to open in new tab if iframe is blocked.
Don’t:
- Don’t hardcode links for multiple variants — use a CMS.
- Don’t assume permissions are the same across all browsers; test iOS and Android.
- Don’t display buttons if the CMS link doesn’t exist.
Optional advanced tips
- A/B test matrix: modal vs. new tab × copy × placement (see A/B ideas on integralis.dev).
- Dynamic JS: Use CMS data attributes to swap iframe.src when necessary—keep scripts minimal.
- Accessibility deep dive: Focus management on modal and consent for snapshots/downloads.
Conclusion + CTA
You can add eyewear try-on to your Webflow PDP quickly and without engineering with link-based VTO. Create a link on tryitonme.com, host it in your CMS, and choose an embed method based on your UX goals. VTO can increase engagement and reduce returns when measured and implemented correctly. Ready to get started? Request a demo at tryitonme.com/demo.
Assets to include in the post
- Annotated screenshot Webflow Designer: alt=”Webflow Designer: binding Try On URL to PDP button”.
- GIF: Click Try On → modal with embedded tryitonme.com iframe opens. Alt: “Try It On modal opening from product page”.
- Example modal HTML/CSS snippet (minified). Alt: “Modal HTML and CSS example for embedding try‑on iframe”.
- Downloadable PDF: printable QA checklist. Alt: “QA checklist for launching try‑on on Webflow”.
- Small SVG icons (camera, try‑on). Alt: “Camera icon for try‑on button”.
- Embed element usage reference: Webflow Embed.
SEO & meta guidance
- Meta title suggestion: “Eyewear Try On Webflow: No‑Code Virtual Try On Guide | TryItOnMe”.
- Meta description suggestion: “Add eyewear try on Webflow to PDPs easily—no SDKs. Step‑by‑step for buttons, modals, iframes. Boost conversions 20–50%.”
- Make sure the primary keyword is in the H1 and opening paragraph; use natural related keywords in H2/H3.
CTAs & promotion suggestions
- Primary CTA: Request a demo — tryitonme.com/demo.
- Secondary CTA: Download the QA checklist PDF (hosted on your asset CDN).
- Social copy examples: LinkedIn & Twitter/X text samples (include modal GIF).
Editorial & production checklist before publish
- [ ] Primary keyword in H1 and first paragraph.
- [ ] All external links are checked (tryitonme.com, Webflow University, GA4, integralis.dev, YouTube, FittingBox).
- [ ] Screenshots are annotated and alt text is filled in.
- [ ] QA checklist PDF is attached and linked.
- [ ] GA4 events or instructions are included.
- [ ] CTAs point to tryitonme.com/demo and tryitonme.com.
- [ ] Accessibility checks for code snippets and modals.
Final notes
This guide was written to help you quickly implement eyewear try-on in Webflow with minimal developer involvement. Use the steps, checklist, and tracking suggestions to launch, test, and iterate. Ready for a live demo: tryitonme.com/demo.
FAQ
- Does tryitonme.com store user photos from the camera?
- VTO typically requests camera access for local preview. Most link-based providers perform vendor-side processing for fitting, but storage policies depend on the provider—check TryItOnMe’s privacy policy or ask directly. Include microcopy explaining data usage and permissions.
- Does the VTO iframe work in iOS Safari?
- Some mobile browsers (including iOS Safari) have restrictions on cross-origin camera access in iframes. Modal iframes can work in many desktop cases; provide a fallback to open the link in a new tab if the camera is blocked.
- How do I map variants (colors) to the VTO link?
- Plan a per-variant CMS field (or variant collection structure) so that Webflow native toggling will display the correct Try On URL. Alternative: render data attributes and swap iframe.src via small JS when the variant changes.
- Does a developer need this implementation?
- Not for basic scenarios: paste the link into the CMS and bind it to a button or Embed. You may need a developer for advanced variant logic, custom analytics wiring, or fallback detection scripts.
- Does VTO really reduce returns?
- Many industry summaries show a decrease in returns after adopting VTO and an increase in conversions — see integralis.dev for data and studies. Actual results depend on the quality of model fitting and UX implementation.