 Eyewear Try On Squarespace — How to Add a PDP Try-On Button (No-Code) and Optional Embed
 Eyewear Try On Squarespace — How to Add a PDP Try-On Button (No-Code) and Optional Embed
- Add a virtual try-on (VTO) to your Squarespace PDP with two options: a no-code link button (recommended) or an inline iframe embed.
- Link-based VTOs like tryitonme.com allow for quick launch without an SDK; they’re ready to go within business days.
- Place a CTA near the Add to Cart button, use UTM for tracking, and QA on iOS/Android/Desktop before going live.
- Include privacy microcopy and a lazy-loading option for performance; use a responsive iframe if an inline embed is necessary.
Introduction
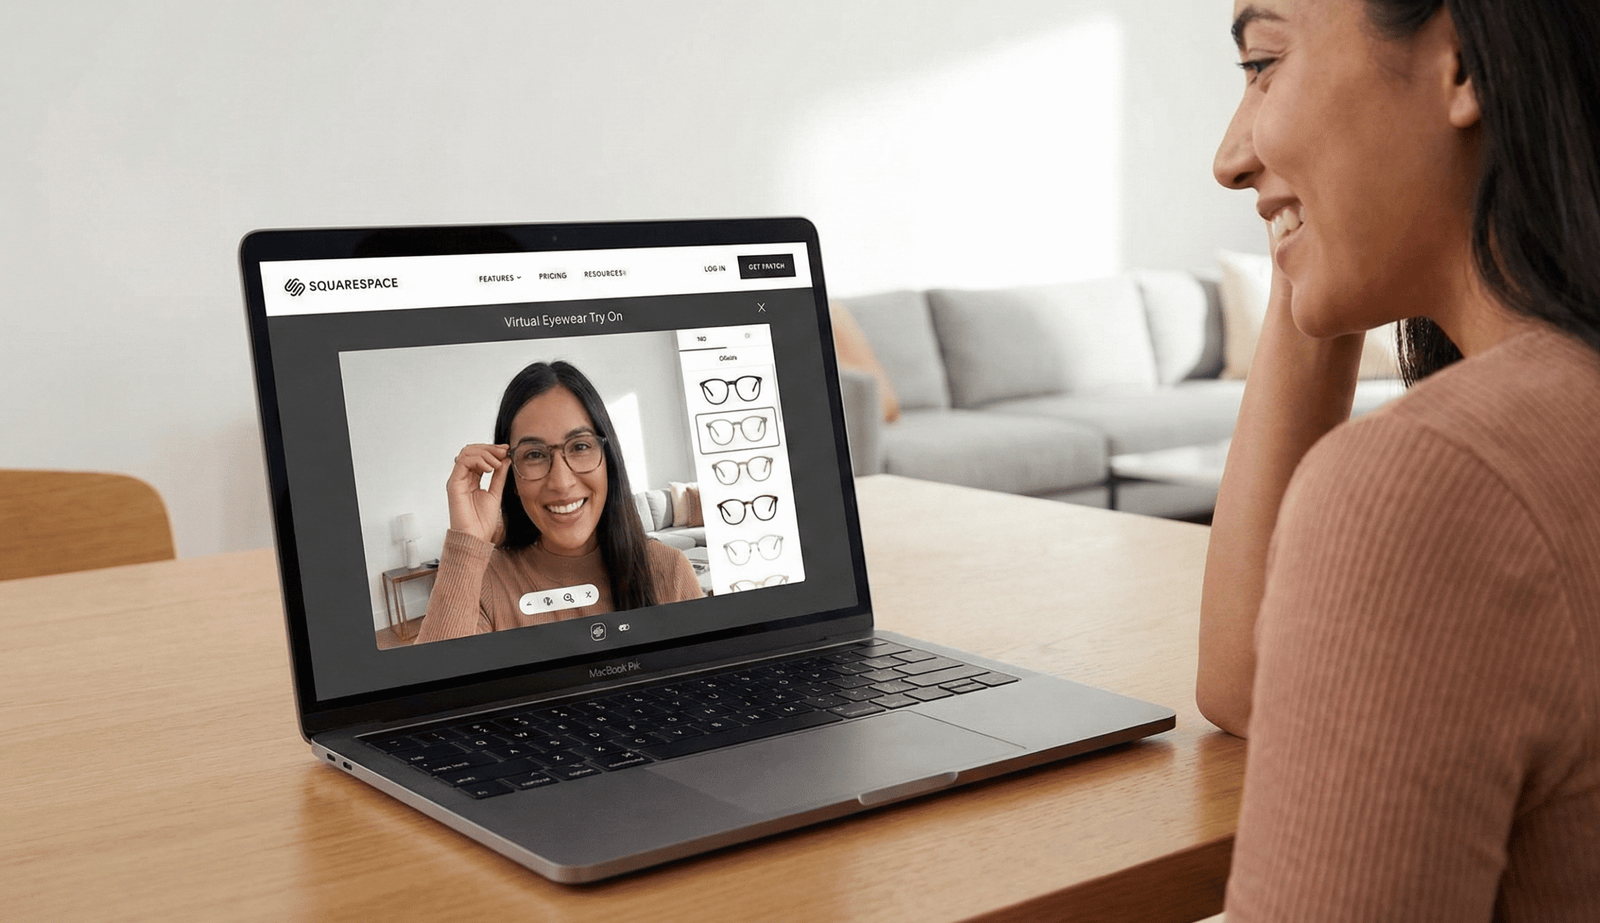
Eyewear try-on on Squarespace: what this guide covers. If you want an eyewear try-on solution live on your Squarespace product page in hours, not weeks, this guide is perfect. Two practical options will be discussed: a zero-code PDP try-on button (recommended) and an optional iframe embed for an inline experience. I recommend the VTO link-based service tryitonme.com, which provides a ready-to-use try-on link without any SDK or heavy integration.
Why add an eyewear virtual try-on to your Squarespace store
Virtual try-ons on Squarespace move visitors from static photos to live previews, reducing uncertainty and increasing purchasing confidence. Practical business outcomes include increased conversions, longer session durations, and reduced returns—all important KPIs for eyewear, jewelry, and accessory stores. For background on how virtual glasses try-ons reduce returns and increase confidence, see Perfect Corp.’s commerce guide. ROI data for link-based VTO is available in the ROI report.
Preparation — what you need before embedding
Checklist before you start:
- Assets & account: tryitonme.com product links, product photos, and SKU mapping to links.
- Prepare standard product photos (front/side for eyewear) and a SKU table that maps Squarespace SKUs to tryitonme links. Photo guide: photo & product image guidance.
- Define CTA text (Try On, Try On Glasses, See It On You) and brand colors for buttons.
Permissions & Squarespace version: Make sure your site uses HTTPS to avoid mixed-content blocking; Squarespace and storefront guide: Squarespace storefront notes. Use Squarespace 7.1 for the best block support; Developer Mode is only required for site-wide automation.
Two implementation options for Squarespace
There are two practical paths depending on time, scope, and developer access:
Option A — Embed try on Squarespace inline (Code Block / Embed Block / Code Injection)
- Best if you want inline try-ons to always be visible on PDPs (resident visitors to the page).
- Use Code/Embed Block or template-level injection for iframes. Estimated work time is 3–6 hours for clean, responsive styling.
- iframe/embed best practices: see the best practices and no-code explanation in the video.
Option B — PDP try on button (link-based, zero-code — recommended)
- Fastest path: add a button that opens a tryitonme link. Zero-code, launch in 1–2 hours.
- Recommended for quick rollout and measuring impact before committing to an inline embed.
- Pricing & sign-up information: tryitonme pricing.
Step-by-step: Add an eyewear try on to a product page
The following steps outline the implementation of a no-code button and then iframe embed.
Create the tryitonme.com link for your product (link generation & parameters)
- On the tryitonme dashboard, select or create a product entry and copy the product link (format:
https://tryitonme.com/t/PRODUCT_LINK). Demo/support: demo. - Optional: add UTM like
?utm_source=squarespace&utm_medium=pdpfor analytics.
Add a PDP try on button (no-code) — exact steps in Squarespace editor
- Open your site in the Squarespace editor (7.0/7.1).
- Edit the product page, preferably below the product images or near the Add to Cart tab.
- Add a Button Block or Code Block with an anchor tag.
- Set the button text (e.g., Try On Glasses), paste the try-onme link in the URL field, and choose a styling option.
- Save and preview on mobile and desktop.
No-code anchor button (copy verbatim):
<a href="https://tryitonme.com/t/PRODUCT_LINK" class="sqs-block-button">Try On</a>Embed try on Squarespace (iframe/embed) — exact steps and recommended attributes
- In the product editor, add a Code Block to the desired position.
- Paste the iframe snippet and adjust the height. Use lazy loading and camera allow attributes for performance.
Iframe embed (copy verbatim):
<iframe src="https://tryitonme.com/t/PRODUCT_LINK" style="width:100%;height:600px;border:0;" allow="camera; autoplay"></iframe>Recommended production edits:
- Add
loading="lazy"to the iframe for performance. - If you need a mic/voice,
allow="camera; microphone; autoplay". - Use a responsive wrapper or
aspect-ratiofor proper mobile sizing.
Theme edits if you want persistent CTA or in-grid placement
For site-wide placement, add a script in the Code Injection header that maps SKUs to tryitonme links and inserts a button into the product template. This change requires developer access; estimate 3–6 hours of work for full automation. Storefront setup reference: Squarespace storefront notes.
PDP placement best practices
- Place the Add to Cart button near or above the fold so it’s visible without scrolling.
- Place it in the product image area for stronger visual association.
- Microcopy CTAs: “Try On,” “Try On Glasses,” “See It On You.”
- For mobile, deep-linking to the camera provides a near-native experience; UX guidance: mobile UX guide.
Styling & accessibility
- Responsive iframe CSS: gunakan
aspect-ratioatau wrapper agar embed tidak overflow. - ARIA untuk screen readers: contoh
<a aria-label="Virtual try-on for [Product]" href="...">Try On</a>. - Keyboard focus: pastikan tombol dapat diakses dengan keyboard.
- Privacy microcopy (verbatim suggestion): “This feature uses your camera for a live virtual try-on. No images are stored without consent.” — sertakan dekat tombol atau modal.
QA checklist before going live
Checklist singkat untuk QA:
- Fungsional: Try-on loads, camera permission prompt muncul, glasses track to face.
- Visual: overlay scale & alignment.
- Cross-device: iOS Safari, Android Chrome, Desktop Chrome/Edge/Firefox.
- Performance: lazy-load, CLS check. Mobile performance tips: mobile performance guidance.
- Privacy: microcopy & consent flows terkonfirmasi.
Referensi QA praktis: Plattar guide.
Troubleshooting common issues
- Mixed content/blocking: pastikan halaman HTTPS; gunakan link tryitonme HTTPS.
- Camera permissions: beberapa versi iOS menangani prompt berbeda — beri instruksi untuk allow di browser settings jika perlu.
- Iframe sizing: gunakan
aspect-ratioatau ubah height untuk breakpoint mobile. - Squarespace link behavior: jika
target="_blank"diblokir, pakai lightbox script atau biarkan link buka di tab yang sama.
Tracking, analytics & optimization
- Tag tryitonme links dengan UTM untuk meng-identifikasi source/medium di GA4, mis.
?utm_source=squarespace&utm_medium=pdp_try_on_button. - Track clicks sebagai GA4 events (mis.
try_on_click) via header script atau Google Tag Manager. - A/B test placement, copy, dan warna tombol untuk CTR tertinggi. Strategi tagging: tagging & analytics.
- Contoh measurement plan & GA4 events untuk VTO: analytics plan.
Example implementations & code snippets
Ready-to-copy code (repeated untuk kemudahan editor):
No-code anchor button (copy verbatim):
<a href="https://tryitonme.com/t/PRODUCT_LINK" class="sqs-block-button">Try On</a>Iframe embed (copy verbatim):
<iframe src="https://tryitonme.com/t/PRODUCT_LINK" style="width:100%;height:600px;border:0;" allow="camera; autoplay"></iframe>Responsive CSS snippet (example) — letakkan di CSS editor theme jika perlu:
iframe { max-width: 100%; height: auto; aspect-ratio: 4/3; display: block; }Final checklist and launch plan
- No-code button di beberapa PDP kunci: 1–2 jam.
- Iframe embed atau template edits untuk site-wide: 3–6 jam.
- Full rollout dengan QA & analytics: 1–3 hari.
- Langkah final: buat tryitonme link → tambah button/embed → QA di 3 device → pasang analytics tracking.
Why tryitonme.com is the Right Fit for Your Business
- Zero-code, link-based deployment — paste link atau iframe tanpa SDKs: tryitonme.com.
- Waktu ke pasar cepat — link try-on unik disediakan dalam kurang dari 3 hari kerja setelah onboarding: book a demo.
- AR processing ditangani oleh team + AI: demo.
- Pilihan pricing & support: pricing, support.
Call to action — Get started with tryitonme.com
Quick start:
- Buat tryitonme link pertama di https://tryitonme.com/demo.
- Suggested PDP microcopy: “Try On” / “See It On You”.
- Final checklist: create link → add button → QA on 3 devices → monitor analytics.
Ready to move fast? Book a demo.
Deliverables for writer & designer
Mohon siapkan aset berikut saat menyerahkan artikel:
- Full draft dengan struktur H2/H3 di atas (1,400–1,800 words).
- Dua code snippet persis (anchor & iframe) disertakan di how-to section.
- Screenshots: tryitonme dashboard (link generation), Squarespace editor dengan button/code block.
- GIF: mobile PDP try-on flow (tap button → open camera).
- QA checklist (compact bullet form) — sudah disertakan di atas.
- CTA links: demo, support.
FAQ
1. How quickly can I launch a no-code button?
Typically, it takes 1–2 hours per PDP: create a link in the dashboard, add a Button Block or Code Block, paste the link, and then conduct a quick QA on mobile and desktop.
2. Does embedding an iframe affect site performance?
Iframes can increase load, especially on camera-enabled pages. Use loading="lazy", the required allow attribute, and a responsive wrapper. Perform CLS and mobile performance testing.
3. What about privacy and camera permissions?
Include privacy microcopy, such as “This feature uses your camera for a live virtual try-on. No images are stored without consent.” And ensure the permission experience is clear on iOS/Android, as prompt behavior can vary.
4. Can I track clicks and conversions from the Try On button?
Yes—add UTMs to the link and track clicks as GA4 events (e.g., try_on_click) via GTM or a custom script. A/B test placement and copy to optimize CTR.
5. Do I need developer access for site-wide buttons?
For automated site-wide placement (SKU-to-link mapping & template injection), you’ll need developer access or familiarity with templates; manual addition per PDP isn’t required.
6. What are the advantages of choosing tryitonme over other options?
Key advantages: zero-code link-based deployment, fast time to market (<3 days for link after onboarding), and AR processes handled by the team + AI. More information: pricing, demo.