Blue Light Glasses Try On Accuracy: Landmarking, Occlusion, Pose and Size & Fit Calibration for Reliable Virtual Try-On
Quick Summary
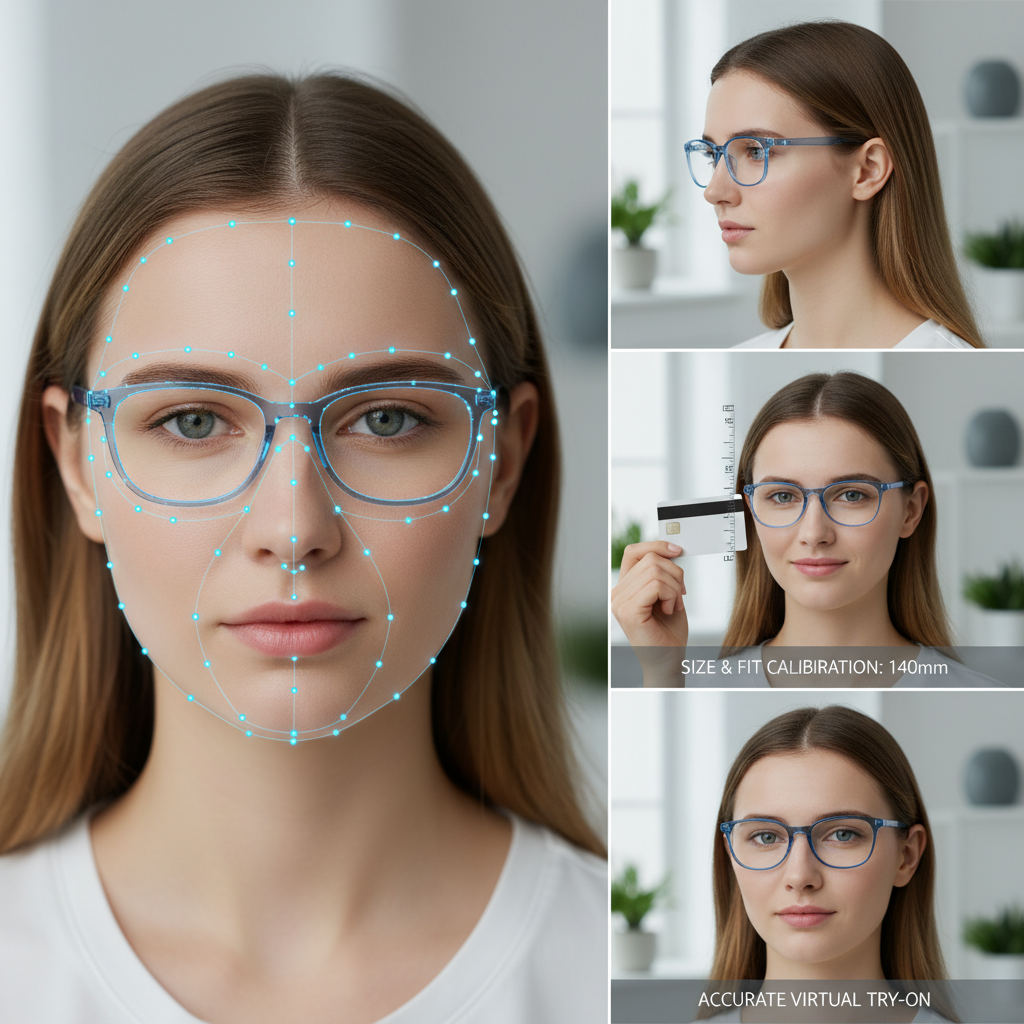
- VTO accuracy for blue-light glasses relies on face/hand landmarking, occlusion handling, pose estimation, and size calibration for a realistic fit.
- Calibration can be automatic (IPD), with a reference object (card/coin), or an interactive slider to balance friction and accuracy.
- Occlusion and temporal smoothing are crucial for realism—use segmentation, depth cues, and temporal filters.
- Tryitonme provides a link-based solution without an SDK/API for quick deployment; upload a product photo and receive a try-on link within ~3 business days (https://tryitonme.com).
Table of Contents
Introduction — blue light glasses try on accuracy
Blue light glasses try on accuracy is the difference between a gimmicky filter and a credible online purchase. For eyewear merchants, getting alignment, scale, and occlusion right isn’t cosmetic — it’s core to user comfort, optical performance and buyer confidence. If the virtual optical center is off, or the frame appears to float or clip through fingers, users will hesitate to buy and are more likely to return the product.
This post walks you through the technical building blocks that determine accurate blue light glasses try-on: face and hand landmarking, occlusion handling, head pose and scaling, and size & fit calibration. You’ll get practical guidance on validation, UX patterns, and deployment options — and a clear picture of how a zero-code, link-based VTO platform like tryitonme.com can deliver a ready-to-share try-on link after you submit standard product photos (front/side) and choose a package. The platform handles AR processing and returns a unique try-on link in under 3 business days so you can publish across web, mobile, and social channels without SDKs or APIs (see tryitonme.com).
Why accuracy is critical for eyewear VTO — blue light glasses try on accuracy
Accuracy matters for eyewear VTO in ways that differ from fashion accessories. Blue light glasses are often purchased for a functional reason — reducing eye strain and filtering blue wavelengths — and that makes alignment and fit more consequential:
- Optical center alignment: Lenses must place their optical center near the user’s pupils for the intended filtering and visual comfort. Misalignment can reduce perceived effectiveness and create binocular discomfort.
- Physical fit: Temple length, nose bridge seating, and overall frame width influence comfort and wearability. If a try-on shows a frame that sits too high, too narrow, or too loose, the customer’s expectations will mismatch the real product.
- Perceived tint and coating: Realistic rendering of lens tint and reflections sets proper expectations for blue light filtering appearance.
For your business, those technical elements map directly to KPIs you care about: conversion, returns, and brand trust. Rather than claiming fixed thresholds, treat these as example KPIs to measure: optical center offset (mm), angular pose error (degrees), and user-fit acceptance rate (%). Use them as recommended targets to monitor and iterate — employ lab and field testing (described below) to establish your brand’s acceptance thresholds.
Core technical components overview — face/hand landmarks try on, occlusion try on
Here’s a concise mapping of components to outcomes so you can see how each piece contributes to perceived accuracy:
- Face/hand landmarks try on — Detects eyes, nose, ears and fingers so frames align and interactions look natural. Outcome: correct optical center and interaction-aware rendering.
- Pose estimation — Tracks yaw/pitch/roll for perspective-correct rendering and parallax. Outcome: frames rotate and foreshorten correctly.
- Occlusion try on — Handles hands, hair and glasses overlapping the face. Outcome: correct layering and realism when users touch frames.
- Scaling / size & fit calibration — Converts landmark distances into physical millimeters to match real frame dimensions. Outcome: accurate perceived sizing and better fit predictions. See the frame-fit guide for details: Frame fit try-on guide.
- Real-time smoothing — Temporal filters (e.g., Kalman-like smoothing) reduce jitter for stable overlays. Outcome: stable visuals that feel premium. For mobile performance notes see mobile performance guide.
Why tryitonme.com is the Right Fit for Your Business
- Zero-code, link-based deployment: no SDKs or APIs — generate a shareable try-on link you can use across product pages, social ads and email. (tryitonme.com)
- Fast time-to-market: submit standard product photos and receive a ready-to-use try-on link in under 3 business days.
- Accessory-focused accuracy: models and processing tuned for eyewear (optical center, temple fit, lens tint).
- Flexible calibration: supports auto-scaling, manual slider adjustments and two-photo card/coin methods. For guidance on pricing and packages see the pricing breakdown: pricing & packages.
Book a Demo — request a live demo or start a trial via the contact page: tryitonme.com/contact.
Deep dive — Face/Hand Landmarks Try-On (face/hand landmarks try on)
What it is and why it matters
“Face/hand landmarks try on” is the foundation of precise eyewear alignment. Landmarks are keypoints detected on the face (eyes, nose tip, nostrils, ear landmarks, jawline) and hands (finger joints, palm) that let your system infer geometry and interaction. When accurate, landmarks enable correct optical center placement, realistic frame positioning, and believable interactions when a user touches or adjusts frames.
Landmark types and density
- 2D landmarks: A common approach that provides coordinates in image space (x,y) — sufficient for many overlay tasks.
- Denser 2D/3D sets: Higher-density point clouds or 3D reconstructions (using dozens to hundreds of points) provide richer shape detail and support 3D pose recovery and foreshortening. For guidance on choosing between 2D and 3D approaches, see this comparison.
- Hand landmarks: Track at least fingertips and knuckles to decide when fingers occlude frames.
Note: Vendor and research models vary in landmark counts and dimensionality; choose a density that balances computational cost and required geometric fidelity for your product styles.
Detection and tracking techniques
- Neural detectors: Modern approaches use neural networks trained on annotated datasets to detect landmarks per frame.
- Temporal tracking: Combine frame-wise detection with temporal models so transient failures or jitter don’t create visual artifacts.
- Multi-view/geometry cues: Where available, stereo or multi-camera inputs improve depth inference; single-camera solutions use learned priors and temporal consistency.
Post-processing and robustness
- Confidence thresholds: Ignore or down-weight low-confidence points.
- Smoothing filters: Kalman filters or exponential smoothing reduce jitter while preserving responsiveness. Tune smoothing time constants to the typical motion speed in your use case.
- Occlusion-aware interpolation: When landmarks are occluded, use previous good values or model-based priors to maintain plausible geometry instead of snapping or collapsing overlays.
Practical mitigations for common failure modes
- Jitter and noise: Apply temporal smoothing and a small hysteresis before switching overlay states.
- Partial occlusions: Combine hand landmarks and segmentation maps to detect occlusions instead of relying on single-point failures.
- Low-light and reflections: Fall back to higher-confidence landmarks (eyes and nose root) and surface normals inferred from shading, or prompt the user for a retake.
Implementation patterns for product-grade experiences
- Use robust pre-trained detectors as a baseline; refine with small, product-specific fine-tuning if you have proprietary images.
- Create a confidence-score pipeline that gates overlay placement: if confidence dips below a threshold, show alignment guidance or request a retake.
- Visual feedback: display subtle alignment guides (pupil markers, frame centering boxes) during calibration and the try-on itself.
- Dev/QA: include automated tests that feed recorded videos across representative lighting and pose ranges to validate landmark stability.
Suggested visual assets
- Annotated landmark map (alt text: “Annotated face and hand landmarks for eyewear alignment”).
- GIF: before/after smoothing demonstrating jitter reduction (alt text: “Jitter reduction using temporal smoothing”).
Handling Occlusion Try-On (occlusion try on)
What “occlusion try on” means
Occlusion handling ensures virtual frames render in the correct visual order when hands, hair, or the glasses themselves overlap facial regions. Good occlusion handling keeps frames from unrealistically appearing above fingers or cutting through hair, improving perceived realism and trust.
Occlusion pipeline overview
1. Semantic segmentation: classify pixels into face, hair, hands, eyewear, background.
2. Depth ordering / z-prediction: estimate per-pixel or per-region depth to decide which element sits in front.
3. Mask compositing: use per-pixel alpha blending guided by segmentation and depth to composite the virtual frame correctly.
Strategies and techniques
- Learned occlusion masks: Train models specifically to predict occlusion masks around the face and hands so overlays can be clipped precisely where fingers intersect frames.
- Monocular depth estimation: When stereo is not available, monocular depth models provide a depth approximation that helps determine whether a hand in front of the face should occlude a frame.
- Hand landmarks as occlusion cues: Use detected hand keypoints to dynamically create masks that hide parts of the frame where fingers cover them.
- Per-pixel alpha blending: Avoid hard binary masks; soft alpha edges produce more natural blending near hairline and fingers.
Edge cases and UX mitigations
- Backlighting and reflections: Strong lighting or glossy frame coatings can confuse segmentation and depth. Mitigate by prompting users to avoid direct backlight and by using small on-screen hints.
- Complex hairstyles: Scoping segmentation models to include varied hair textures and styles improves mask accuracy.
- Rapid occlusion change: Smooth transitions when occlusion state changes (fade instead of jump) to reduce visual distraction.
- Low-confidence fallback: If occlusion confidence is low, temporarily show a simplified visualization (e.g., outline-only) and offer “try without occlusion” as a user choice.
Product and behavioral UX patterns
- Camera guidance: short onboarding suggesting hand placement and lighting improves data quality.
- Tap-to-reveal: allow users to momentarily reveal the frame beneath a hand to confirm fit.
- Small reticle or shadow under the frame: subtle shadows can imply spatial relation and reduce occlusion artifacts’ noticeability.
Occlusion-capable model variants can be packaged and delivered behind a shareable try-on link so the same occlusion logic runs consistently across web and mobile without SDK integration.
Suggested visual assets
- Occlusion mask examples (alt text: “Occlusion masks showing correct hand over frame masking”).
- GIF showing tap-to-reveal and soft alpha blending (alt text: “Tap-to-reveal occlusion handling demo”).
Pose, Scaling and the Role of Size & Fit Calibration (size & fit calibration; blue light glasses try on accuracy)
Why pose and scaling matter
Head pose (yaw/pitch/roll) determines how frames should rotate, tilt and foreshorten in 3D space. Scaling maps frame dimensions to the user’s face so the virtual frame’s physical size matches the product’s real-world measurements. Together, pose and size & fit calibration make the try-on believable and useful for sizing decisions.
Head pose estimation
Output: Typically three angles — yaw (left/right), pitch (up/down), and roll (tilt). Accurate pose produces correct perspective and parallax when the head moves.
Methods: Combine 2D landmarks with a morphable face model or use direct pose regressors. Temporal smoothing reduces jitter while preserving responsiveness.
Scaling and physical mapping
The core task: translate distances in image pixels (e.g., interocular distance in pixels) into millimeters using calibration data. Common inputs: detected interpupillary distance (IPD) from landmarks, face width, or a known-size reference (card or coin) included in a calibration photo. For deeper reading on measuring pupillary distance and its impact on fit, see the PD guide: Pupillary distance try-on guide.
Size & fit calibration flows
You’ll typically choose among three flows depending on friction tolerance and accuracy needs:
- Auto-IPD (low-friction)
- Pros: Seamless, no user action required.
- How it works: Infer IPD and face width from landmarks and scale frames accordingly.
- Trade-offs: Works well for average cases but can drift on extreme proportions or with occluded landmarks.
- Two-photo reference (card/coin method)
- Pros: Higher absolute scale accuracy because a known object provides a pixel/mm conversion.
- How it works: User photographs their face holding a standard-size object (credit card, coin) at the same plane as the face.
- Trade-offs: Adds friction to the flow; you must guide users carefully for reliable scale. Practical guidance is available in the frame-fit guide: frame-fit try-on guide.
- Interactive slider / user fine-tune
- Pros: Allows users to visually match a physical frame to their face using a slider with mm labels.
- How it works: Provide an on-screen control to scale the frame and confirm fit; save the user’s calibration for future sessions.
- Trade-offs: Requires user effort but increases perceived control and satisfaction.
Mapping 2D to 3D and foreshortening
Converting 2D landmarks into a 3D pose and frame placement requires either a 3D face model or learned geometry. The goal is to apply appropriate foreshortening to temples and rims so that side views and head rotations look physically plausible. If you use a 3D CAD model of your frames, align its model-space metrics (lens width, bridge, temple length) with the detected face-space metrics during calibration. If you’re evaluating 2D vs 3D approaches for your catalog, practical trade-offs are summarized here: 2D vs 3D try-on comparison.
Recommended metrics to monitor (as suggested KPIs)
- Scaling error (mm): deviation between virtual and physical expected measurements.
- Angular pose error (deg): how far the rendered frame pose differs from ground truth.
- Perceived fit score: user survey metric indicating subjective fit satisfaction.
Practical UX recommendations
- Default to auto-IPD for first-run frictionless experience; offer an unobtrusive “Improve fit” CTA to enter a card/slider calibration flow.
- Provide a clear calibration UI with visual overlay comparison and simple instructions (e.g., “Hold a credit card under your chin and take a photo”).
- Remember to store user calibration when they opt in — it improves repeat visits and cross-device consistency.
Visual examples to include
- Calibration UI mockups showing card/coin method and interactive slider (alt text: “Calibration UI for card reference and interactive slider”).
- Before/after scaling comparisons (alt text: “Before and after size & fit calibration examples”).
Validation, Testing and Metrics — blue light glasses try on accuracy
Lab and field testing
Lab tests: Use 3D-printed head forms and controlled rigs to validate alignment across poses and lighting conditions. These allow precise ground-truth measurements.
Field tests: Collect opt-in telemetry from real users (landmark positions, confidence scores) and run A/B tests to evaluate calibration UX variants and their impact on conversion.
Diversity and coverage
Ensure tests include a broad range of skin tones, ages, facial shapes and accessory styles. Different hairstyles, facial hair, and makeup styles can affect landmark and segmentation performance.
Recommended quantitative metrics
- Mean optical center offset (mm): average distance between detected optical center and ground-truth pupil location.
- RMS angular error (degrees): root-mean-square of yaw/pitch/roll error.
- Occlusion mask IoU: intersection-over-union between predicted and ground-truth occlusion masks.
- Stabilization jitter (pixels/frame): measures overlay jitter across frames.
Qualitative testing
- Perceived realism surveys: ask users to rate realism and fit on a Likert scale.
- Usability testing: observe where users get stuck during calibration and how often they retake photos.
Acceptance thresholds and guidance
Rather than prescribing absolute thresholds for all businesses, treat recommended values as starting points to tune against your product and customer expectations. For example, tighter optical products (prescription lenses) justify stricter thresholds than casual blue-light-only styles. For vendor evaluation and objective checklists to assess providers and pilots, consult the vendor checklist: vendor checklist.
UX and Product Considerations (face/hand landmarks try on; size & fit calibration)
Onboarding and alignment guidance
- Keep microcopy short and actionable: “Center your face and look at the camera” or “Hold a credit card next to your face for better sizing.”
- Use animated alignment guides (eye markers, face oval) during capture to reduce retakes.
- Provide short, skippable tutorials for first-time users.
Accessibility and privacy
- Accessibility: offer automatic calibration options for users with limited mobility; include text/voice instructions and ensure UI is keyboard-navigable.
- Privacy: minimize PII collection, process as much as possible client-side, and use anonymized telemetry. If you intend to store images or personal calibration data, clearly disclose use and offer opt-out.
Error states and recovery
- Offer helpful error messages: “We couldn’t see your face clearly — try better lighting or remove sunglasses.”
- Provide an easy retake flow and a fallback “show me similar styles” option if calibration repeatedly fails.
Implementation & Deployment with tryitonme.com (size & fit calibration; blue light glasses try on accuracy)
Zero-code, link-based deployment
tryitonme.com provides a no-code path to deploy accurate blue light glasses try-on across channels via a shareable link — no SDKs or API integration required. The standard onboarding flow is straightforward:
- Purchase a 6‑month package based on the number of SKUs.
- Send standard product photos (front and side views) per the upload guide.
- tryitonme’s team and AI process the assets (landmark mapping, occlusion-capable rendering, calibration flows).
- You receive a unique, ready-to-use try-on link (typically within 3 business days) to add to product pages, ads, or social posts. See tryitonme.com for details.
How tryitonme addresses key technical challenges
- Landmarks & smoothing: prebuilt, robust landmark detectors with temporal smoothing reduce jitter and improve alignment on live video.
- Occlusion models: segmentation and hand landmark use to deliver realistic occlusion handling where users touch frames.
- Calibration options: flexible calibration flows (auto-IPD, two-photo reference, interactive slider) let you balance friction and accuracy for your audience.
- Consistent model delivery: the same rendering and inference run behind the shared link so experiences remain consistent across devices and channels.
Analytics and iteration
tryitonme supports analytics hooks so you can track per-session calibration method used and user acceptance, monitor landmark confidence and failure modes, and run A/B tests on calibration flows and CTAs to evaluate impact on conversion and returns. For demos and analytics inquiries, contact tryitonme. For a practical measurement plan and recommended GA4 events for VTO, see the analytics guide: try-on analytics guide.
Example merchant flow
- Step 1: Choose package and upload front/side photos.
- Step 2: Select default calibration flow (auto or card) and choose whether to offer manual slider.
- Step 3: Receive try-on link and embed or promote across product pages.
- Step 4: Monitor analytics, iterate on calibration UX, and request refinements as needed.
Mini-case (illustrative)
Many merchants see improved customer confidence with occlusion-aware renderings and optional two-photo calibration flows. For specific case studies or performance data, request a demo from tryitonme.
Visual & Interactive Assets to Include in the Post (occlusion try on; face/hand landmarks try on)
Recommended assets for the article and product pages:
- Annotated landmark map (alt: “Face and hand landmark annotations for eyewear placement”).
- Pose axes illustration (alt: “Yaw, pitch and roll axes for head pose estimation”).
- Occlusion mask examples (alt: “Occlusion masks showing hand overlapping frame”).
- GIF: smoothing before/after (alt: “Temporal smoothing reduces overlay jitter”).
- Calibration flow video demonstrating card and slider methods (alt: “Calibration flow using a credit card and an interactive slider”).
- Before/after overlay comparisons for size & fit calibration (alt: “Before and after fitting showing improved frame size match”).
- Screenshot of tryitonme link generator UI (alt: “Tryitonme link generator UI for creating shareable VTO links”).
SEO and Keyword Placement Guidance (blue light glasses try on accuracy; occlusion try on; face/hand landmarks try on; size & fit calibration)
- Place the primary keyword in the H1 and the first paragraph, and include it naturally in at least one H2.
- Use secondary keywords in their target sections: “face/hand landmarks try on” in the landmark deep-dive and UX guidance; “occlusion try on” in the occlusion section and captions; “size & fit calibration” in pose/calibration and deployment sections.
- Avoid keyword stuffing: one to two occurrences of main keywords per subsection is sufficient.
Actionable Appendix — Technical Checklist (face/hand landmarks try on; size & fit calibration)
- Data: collect diverse annotated face and hand images, including occlusions and multiple lighting conditions.
- Model stack: facial and hand landmark detector; semantic segmentation model; monocular depth/pose estimator; smoothing/temporal filter.
- Calibration: implement auto-IPD; add card/coin two-photo flow; provide interactive slider for user override.
- Validation: set up lab rig with printed heads and field telemetry capture for landmark confidence and error histograms.
- Monitoring: capture per-session metrics (optical center offset, pose error, occlusion IoU, jitter) and user feedback.
- UX: onboarding microcopy, alignment guides, retake flows, accessibility options and privacy notice.
Closing / Call to Action — blue light glasses try on accuracy
Delivering trustworthy blue light glasses try-on requires solving landmarking, occlusion, pose and size & fit calibration together — not in isolation. If you want a low-friction path to deploy accurate, accessory-focused virtual try-on across channels, tryitonme.com provides a no-code, link-based solution with fast turnaround. Ready to see it in action? Book a demo or request a shareable try-on link today at tryitonme.com/contact.
Additional resources and readings (internal references)
- tryitonme eyewear platform overview
- Blue light glasses virtual try on pricing and packages
- Frame fit practical guide and PD/IPD workflows
- Pupillary distance measurement for online try-on
- 2D vs 3D try-on comparison for eyewear
- Vendor checklist for evaluating blue light glasses try-on providers
- Mobile performance optimization for VTO
- Try-on analytics measurement plan
FAQ
1. How accurate does IPD estimation need to be for usable blue light glasses try-on?
For casual blue-light-only styles, auto-IPD within ~3–5mm is often acceptable for perceived fit; for tighter fit expectations or prescription workflows, aim for sub-2mm accuracy or use a card/coin calibration flow to reduce pixel→mm error.
2. What are common failure modes and how should I handle them?
Common failures include jitter, occlusion misclassification, and scale drift. Mitigations: temporal smoothing/hysteresis, combined hand-landmark + segmentation occlusion handling, and offering a two-photo reference or slider to correct scaling errors.
3. Can I deploy a reliable try-on without integrating an SDK?
Yes — link-based platforms like tryitonme.com deliver a hosted try-on experience via a shareable link, avoiding SDK/API integration while providing consistent rendering and occlusion logic across channels.
4. How should I evaluate a VTO vendor for eyewear?
Evaluate vendors on landmark density, occlusion handling, calibration options (auto-IPD, card/slider), analytics & telemetry availability, demo/test vectors across diverse users, and SLA for producing try-on assets. Use a vendor checklist and sample A/B tests to validate real-world performance.
5. What UX patterns improve calibration success rates?
Provide short onboarding hints, animated alignment guides, a frictionless default (auto-IPD), and an unobtrusive “Improve fit” path to card/slider flows. Include helpful error messages and quick retake options to reduce user frustration.