
Jewelry Try On Wix: How to Add a Virtual Try-On to Your Wix PDP (No‑Code, Embed, and QA Guide)
Quick Summary
- Use link-based VTO (tryitonme) for quick, code-free implementation — paste the link or iframe into your Wix PDP.
- Place a “Try On” button near the product image or Add to Cart button for maximum engagement.
- Prepare your assets: high-quality product photos, SKU mapping, and tryitonme links per SKU before publishing.
- Run a QA checklist (device, browser, camera access, and analytics) before going live.
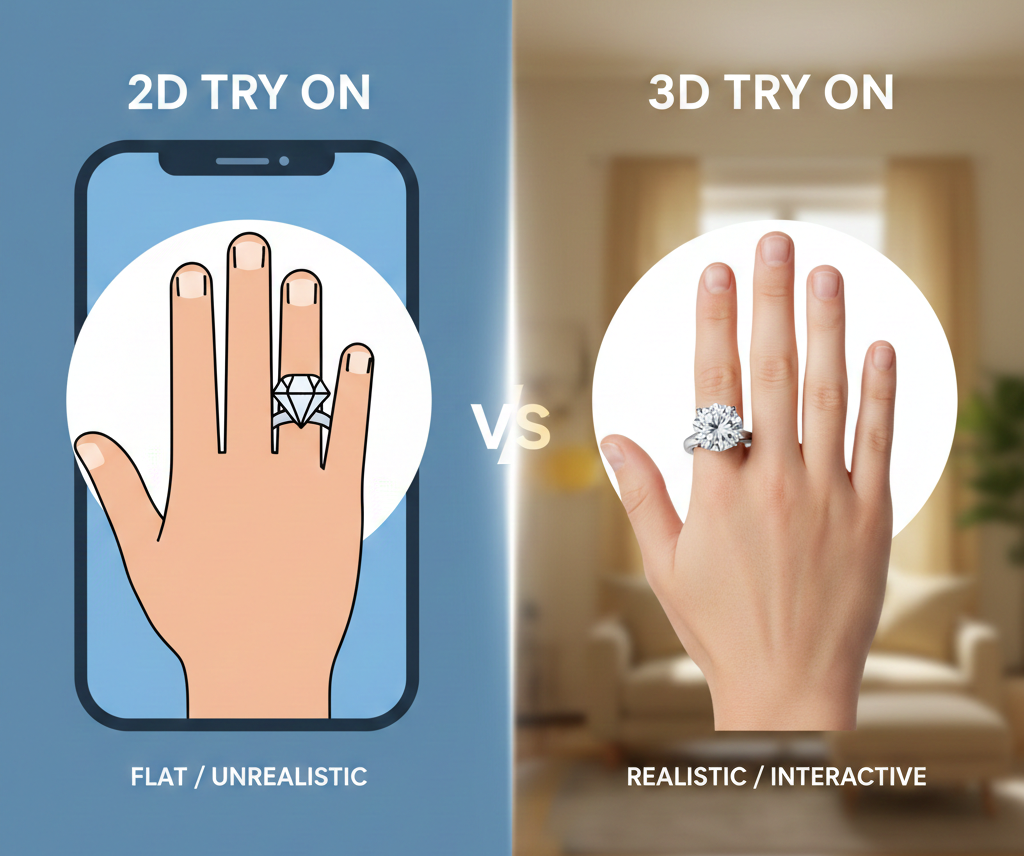
What is Virtual Try‑On and Why It Matters for Jewelry
Virtual try-on (VTO) is a digital tool that lets shoppers preview how a product looks on them before they buy. For jewelry, VTO typically overlays or renders rings, earrings, necklaces, watches, and other accessories on a live camera view or a user photo so shoppers can judge scale, placement, and style in context.
Why it matters for your Wix jewelry store
- It reduces purchase hesitation by giving shoppers a clearer sense of fit and scale.
- It creates a more interactive product experience that can improve engagement on PDPs.
- It’s an easy way to showcase small visual differences (finish, size, drop length) that matter for jewelry.
This guide focuses on a link-based VTO approach you can deploy on Wix quickly — no SDK, no heavy engineering. The tryitonme solution delivers accessory VTO via shareable product links (tryitonme.com), so you can put a working “Try On” link on any PDP, collection page, or social post.
Accessibility note: when you add interactive elements, follow ARIA guidance to ensure the feature is usable with assistive tech. See W3C ARIA guidance.
Overview of Approaches to Add Virtual Try‑On to Wix
Two common approaches exist for adding VTO on Wix:
- Custom SDK/API integration
- Pros: deep control and custom UI.
- Cons: developer time, maintenance, potential cross-platform issues.
- No-code link or embed (recommended for most merchants)
- Pros: fastest, zero-code deployment, cross-channel reuse (web, mobile, social), low maintenance.
- Cons: less deep UI customization than a fully embedded SDK.
If your priority is speed-to-market and minimal development, the link-based/embed approach is the best fit. Wix supports both simple embeds via HTML/iframe and linking actions from buttons; see Wix’s instructions for adding an embed element. For merchants with dev resources, Wix Velo can be used for advanced behavior (Wix Velo).
Why tryitonme.com is the Right Fit for Your Business
If you’re evaluating options for jewelry try on wix, here’s how tryitonme’s process works and why it’s designed for rapid deployment:
- Simple subscription: purchase a 6‑month package based on how many SKUs you need. Pricing & packages.
- Easy asset handoff: you send standard product photos (front/side views as appropriate).
- AR processing handled for you: tryitonme’s team and AI process the assets and build the VTO experience.
- Fast delivery: you receive a unique, ready-to-use try-on product link in under 3 business days. Onboarding & delivery.
Key benefits
- ZERO‑CODE, LINK‑BASED deployment — paste a link or iframe into Wix and go live.
- Cross-channel reuse — same link works in PDPs, social DMs, stories, and emails.
- Rapid time-to-market — ready-to-use links in under 3 business days.
Ready to start? Book a Demo or create your first product link at tryitonme.com.
Pre‑implementation Checklist — What to Prepare Before You Start
Before you add a try-on link to Wix, collect these items:
- tryitonme product links for each SKU (or a list of SKUs to be created)
- high-quality product photos (standard front/side shots)
- product naming convention and SKU mapping
- Wix PDP URLs where the try-on will appear
- Wix Editor access (roles & permissions — see Wix roles & permissions)
- optional Wix Velo access for advanced binding (Wix Velo)
- analytics tracking IDs (Wix/GA4)
- list of target devices/browsers for QA
Having these ready will help your team launch quickly once tryitonme delivers the product links.
Step‑by‑Step: Embed Try‑On on Your Wix PDP
This section walks through the practical steps for adding the VTO link to a product detail page (PDP). Use the zero-code approach first — it’s fastest.
Step 1 — Create the tryitonme product link
- Submit your SKU photos and SKU mapping to tryitonme.
- Name the product link to match your SKU or product handle (e.g., “SKU-1234-StudEarrings”) so it’s easy to map later.
- Expect the link back in under 3 business days from submission (per tryitonme’s onboarding).
Approach A — Zero‑code link/button (recommended)
Use a button that opens the tryitonme link in a new tab or lightbox.
Wix Editor steps
- In the Editor click Add → Button.
- Choose a button style and drag it near your product media or Add to Cart.
- Click Change Text and use labels like “Try On” or “See On Me”.
- Click Link → Web Address → paste the tryitonme product link (tryitonme.com).
- Set Link to open in New Tab or configure to open a lightbox if you prefer a modal flow.
Suggested microcopy under the button: “Tap to try on with your camera — no app required.”
Approach B — Embed / iframe (for an inline experience)
If you want the try-on available inline on the PDP, use Wix’s HTML iframe element.
Wix Editor steps (Embed)
- Add → Embed → Custom Embeds → Embed a Widget.
- Choose HTML iframe and paste the iframe snippet provided by tryitonme (or paste a basic iframe
<iframe src="..."></iframe>). - Resize the iframe container to fit the product area.
- Preview in mobile and desktop, then Publish.
Accessibility and sizing tips
- Add aria-labels to the container or button (e.g.,
aria-label="Try on Stud Earrings — opens virtual try-on"). - Ensure iframe has a title attribute and descriptive label.
- Test keyboard focus for opening and closing the try-on view.
- On mobile, size height generously to avoid scrolling inside the iframe.
Wix embed documentation: https://support.wix.com/en/article/adding-a-site-embed-code-or-html-code-element
Accessibility and mobile checks
- Use clear button text (avoid icons-only without an aria-label).
- Add aria-label for icon-only buttons and iframe title attributes (see ARIA practices: https://www.w3.org/WAI/ARIA/apg/).
- Ensure touch targets are at least 44×44 CSS pixels for mobile.
- Test while using VoiceOver (iOS) or TalkBack (Android) on a sample device.
Screenshot/GIF suggestions
- Editor: Add → Embed → HTML iframe screenshot
- Paste tryitonme link in button link dialog screenshot
- GIF: user taps Try On on mobile, camera permission prompt, VTO appears
Where to Place Your PDP Try On Button (and What to Say)
Placement, copy, and design can influence how many customers use the feature.
Best placements
- Beside or under the main product image
- Near Add to Cart (secondary CTA)
- Inside the media carousel as a media tile
- Floating/sticky button on mobile screens
Copy suggestions (short, actionable)
- Try On
- See It On Me
- Virtual Try-On
- Try Before You Buy
- Try Now
- Preview on Me
Design tips
- Use your accent color so the button stands out.
- Keep padding large enough for mobile taps.
- Use an icon (camera or sparkle) plus text, but include aria-label for the icon.
- Keep the button visually secondary to Add to Cart (don’t compete with purchase flow).
A/B test ideas
- Button near image vs under price
- “Try On” vs “See It On Me”
- Sticky mobile CTA vs static placement
Theme Edits and Advanced Placement (Wix Editor + Velo)
If you want the try-on button to appear automatically on every product, use template edits or Velo.
Add the embed/control to your product template
Edit the product page template in the Wix Editor and add a Button or Embed block to the template so it shows across all product pages.
Bind tryitonme link to SKU / product ID (advanced)
If you store a tryitonme URL in a product field (e.g., in a dataset), you can use Velo to dynamically set the button href.
Advanced conceptual Velo snippet (label as advanced)
// Advanced (optional) — in page onReady: fetch current product ID, get tryitonmeUrl from dataset, set button link
// $w("#tryOnButton").link = tryitonmeUrl;
See Wix Velo docs for details: dynamic pages and Velo reference. Additional guidance: UX & implementation notes.
Responsive and conflict-avoidance tips
- Test breakpoints: mobile, tablet, desktop.
- Lazy-load the iframe if it’s heavy to avoid slowing initial render.
- Avoid placing embeds where sticky headers or popups might cover them.
- Ensure cookie banners don’t block initial clicks.
Note: Most merchants can skip Velo and use simple link/button placement with no dev work.
QA Checklist Before You Publish
Quick actionable tests to run:
- Open the try-on from the PDP button on desktop and mobile.
- Test in Chrome, Safari, Firefox, Edge.
- Verify the try-on opens the correct product link for each SKU/variant.
- Confirm Add to Cart remains visible and functional.
- Check keyboard navigation and screen reader labels.
- Verify camera permission flow for mobile (if VTO uses camera).
- Confirm iframe height and scrolling behavior on mobile.
- Test in-app browser behavior (Instagram, Facebook) for shared links.
- Confirm analytics events fire for try_on_click and try_on_open.
- Ensure no mixed-content or blocked resource warnings (see Wix embed troubleshooting: embed troubleshooting).
Troubleshooting Common Issues
Embed not appearing
- Check that the embed element is enabled and the snippet is correctly pasted.
- Ensure HTTPS/HTTP mismatch isn’t blocking content.
Button not opening correct product
- Verify the tryitonme link matches the SKU and that dynamic bindings (if used) point to the right product field.
Mobile scaling problems
- Increase iframe height, use responsive width, and test on real devices.
Adblockers or extensions blocking content
- Try in Incognito with extensions disabled or advise customers to try standard browsers.
Analytics not tracking
- Confirm event firing and that your GA4/Wix analytics snippets are installed correctly. GA4 events guide: GA4 events guide.
Mixed content or CORS
- Use HTTPS links and host embeds on secure endpoints to avoid mixed-content issues.
How to Measure Success — KPIs to Track
Track these events and metrics:
- try_on_click (button click)
- try_on_open (VTO launched)
- try_on_complete (user finished a try-on session)
- add_to_cart_after_try_on (conversion following a try-on)
- add-to-cart rate and conversion rate for SKUs with VTO
- time-on-page and engagement metrics
Capture these in Wix Analytics and GA4 (Wix Analytics and GA4). Use consistent naming for events to make analysis simple. Analytics example.
Best Practices & Conversion Tips for Jewelry VTO
- Place the pdp try on button above the fold.
- Use product-specific tryitonme links for accurate sizing.
- Add a one-line helper (e.g., “Tap to try on with your camera — no app needed”).
- Promote the same product link in social posts, stories, and customer DMs.
- Use consistent button design across your catalog so customers recognize the feature.
- Start with best-sellers or visually ambiguous SKUs (rings, earrings) to test impact. Rings pricing & notes
Real‑World Example: How a Wix Jewelry Store Might Roll This Out
Hypothetical rollout:
- Week 0: Choose 10 best-selling earrings and order a 6‑month package from tryitonme.
- Week 1: Send standard photos for each SKU to tryitonme.
- Within 3 business days: receive 10 unique try-on links.
- Add a “Try On” button under the main product image for each PDP (zero-code).
- Run QA across devices, publish, promote the feature on Instagram stories using the same link.
- Monitor try_on_click and add_to_cart_after_try_on in GA4.
This sequence gives a low-friction pilot without developer time, letting you measure engagement and expand to more SKUs if results look promising.
Visual & UX Assets to Include in the Post
Collect these visuals before finalizing the post:
- Wix Editor screenshots: Add → Embed → HTML iframe
- GIF of clicking the PDP Try On button and the VTO loading
- Example button CSS snippet (color, padding)
- Printable QA checklist PDF
- Optional Velo code snippet (labeled advanced)
SEO & On‑page Suggestions
- Include the primary keyword “jewelry try on wix” in the title and the first paragraph.
- Use “virtual try on wix,” “embed try on wix,” and “pdp try on button” naturally in H2/H3s.
- Add a meta description: “Add jewelry try on to your Wix product pages with a no-code, link-based VTO. Step-by-step embed options, PDP placement, accessibility, and QA checklist.”
- Mark products that support VTO in your product descriptions (e.g., “Virtual Try-On available”).
- Use Product schema JSON‑LD to indicate availability and enrich results: Google Product structured data.
Internal and External Links to Add
Recommended editorial link plan:
- tryitonme homepage (internal): https://tryitonme.com — link where product links and demo CTAs are mentioned.
- Wix embed help (external): Wix embed help — link in embed steps.
- Wix Velo docs (external): https://www.wix.com/velo — link in advanced/Velo sections.
- GA4 events guide (external): https://support.google.com/analytics/answer/9304153?hl=en — link in analytics/KPI section.
- W3C ARIA guide (external): https://www.w3.org/WAI/ARIA/apg/ — link in accessibility section.
- Wix analytics (external): https://support.wix.com/en/article/view-site-analytics — link in measuring success.
Summary and Next Steps
Adding jewelry try on wix to your product pages can be fast and low-cost if you use a link-based VTO. Here’s a short action plan:
- Create tryitonme product links for the SKUs you want to launch (https://tryitonme.com).
- Add a pdp try on button or embed block to your Wix PDP using the Editor or a simple iframe.
- Run the QA checklist, publish, and track key events in Wix Analytics/GA4.
Final CTA: Ready to see it live? Book a Demo or create your first product link at tryitonme.com.
Editorial & Style Checklist (for publishing)
- Use second-person voice for how-to steps.
- Short paragraphs and numbered steps for scanability.
- Primary keyword in title and opening sentence.
- Include accessibility links and aria-label recommendations.
- Include screenshot/GIF callouts before publishing.
Required Research & Permissions Before Drafting the Final Post
- Obtain access to a Wix dev/test site to capture Editor screenshots.
- Request sample tryitonme product links and permission to use client screenshots.
- Get approval to publish any merchant screenshots or case-study stats.
If you want, I can convert this into a fully formatted CMS-ready post with screenshot callouts and a printable QA checklist. Want me to draft the button CSS snippet and the small Velo sample code block next?
FAQ
1) What’s the quickest way to add VTO to my Wix PDP?
Quickest: use a link-based approach — get the tryitonme product link for your SKU and add it as a button link or iframe in the Wix Editor.
2) Do I need a developer to launch this?
No. For basic deployments, no developer is needed: use a linked button or embed iframe. Use Velo only for dynamic binding or advanced automation.
3) How do I handle accessibility and screen readers?
Add an aria-label to the button/icon, a title to the iframe, and test with VoiceOver/TalkBack. Refer to ARIA practices: W3C ARIA guidance.
4) What assets are needed to create a tryitonme link?
Generally: quality product photos (front/side), SKU mapping, and consistent product/SKU names. tryitonme will process the AR and return a link.
5) Does this work in browsers within apps like Instagram?
It’s worth testing: some in-app browsers restrict the camera or open links differently. Make sure your QA checklist includes in-app browser testing and fallbacks if necessary.